Sunday, March 31, 2013

Hugelkultur..The Wood Composting Method that creates deep soil and saves water ..part 1


Have you ever picked up a rotting log and had it crumble in your hand? Found an old wood pile left to rot? You tried to find some good wood in there but mainly found spongy funk? Yes?! Then you are going to get this right away.
 That rotting wood is the start of your new garden, it's soil in the making! The base you are going to start with, is wood. 
 You begin looking for...Logs, branches, leaves & twigs. Some of us have a lot of them. Some of us don't. In the latter case you look for..rotting untreated lumber, fallen fences, storm ravaged wood wreckage, anybody's unwanted burn pile. You can turn this type of unwanted, clean untreated woody "waste" into a self feeding self watering planting area, with even very poor soil.


The idea is old as the woods quite literally. Hugel means hill or mound in German and combined with the word culture-kultur ( nearly the same in both languages) it describes these log and branch filled mounds. 
The basic idea is you lay out large wood pieces logs stumps, branches etc. and cover it well with a bunch of, compost, leaves, wood-chips what ever you have. Then cover very very well with soil, and plant right away. Read on...

What happens is over the years all that wood is rotting and becoming the perfect combination of spongy and airy...a beneficial environmental cocoon deep inside capable of holding water from winter rains for months and months. 
Warmth from the pile inside rotting gives extra protection from cold, extending your growing 
season. 

Sepp Holzer Illustration 


Garden below demonstrates this, these cucumber seeds were sown the same day from the same seed packet. The added warmth helped quite a bit.

This was a first year side by side experiment..done by one of my readers on Facebook. Right is piled up small wood waste, pine cones and pine bark, covered with soil and compost then with burlap. It was then  planted into. The plot on the left side got the same amount of compost at planting. Left side was watered, right side was not, but for one spring rain shower over night! This is one month of growth. Showing that even small piles offer warmth benefits, and good results.


First off..I know many people are saying now.."won't the wood rob nitrogen?" The answer to that is; That's why most say these are best after the 2nd year. So some folks add manure to speed up the process. I like to point out that the pile should be very well covered, covered deep enough in dirt to grow first year. Nitrogen fixing plants are used as an important part of the polyculture planting recommended, and should not be skipped.


Cedars, Redwood types, Madrone, are not the very best choices because they are known not to rot and have properties that are unhealthy to plant growth. That said they can be used in small amounts or around edges of pile as a border if desired.


Soft woods ..Cottonwood, Apple, Pear, Alder, Maple, Oak. Yes..Pine, Fir tho acid at the start are okay if  dead for a few years. Some choose it to plant acid loving bushes like blueberry.

Hard woods just don't break down and are valuable for other uses like building furniture or firewood. Dead brambles, Wild roses, Trees or bushes that root easily from cuttings like willow should be dried out completely before being buried unless you are trying to make a willow fence! I have heard it suggested to burn willow or other questionable wood down to bio-char if you are in a rush. This can be added to a hugel.
More about good wood and bad wood at Permies forum 
https://www.permies.com/t/12206/hugelkultur/Hugelkultur-Good-wood-Bad-wood


Get a backhoe or digger to match your needs. For the lowest footprint; 
Hire local professional with references 
Use local materials
Make sure work is planned out
make sure digger understands what you need before you begin, they will not hear you when driving.
finish the job to avoid return visit
fix mistakes right away
stay with operator until job is finished, don't walk away!


You want your wood configured on a nicely leveled out spot and at a right angle to flow of water if built on a slope/hill or against the prevailing wind. 
Wood can be placed in a shallow trench, wherever you are working your spot should be level to a max 3 degree variable on a flat spot or terrace. Swales are dug around perimeter as a border for slowing run off, controlling erosion and allowing water to slowly seep in.
Experienced builders with room to do so, recommend building  them TALL 7-10 ft.  These will support a food system for many, many years! 

 Any size works and can be scaled down to fit a small yard too, like here
stack wood nice and neat


Sepp Holzer told us to try to achieve a 70 degree slope for the easiest harvesting on tall beds.

You may mix in composted manure, compost, sod turned over.. but it is recommended to use native or natural soil  and not to use a potting type blend. Clay content is fine, and in fact helpful for holding moisture. The wood will become compost in time. Hugelkultur is wonderful for breaking up clay soils and making them fertile.

The final steps are as important as building the hill, a polyculture planting is recommended. 
When you are all covered with soil, sprinkle with straw then find leafy branches and stand them up against the beds. You will then need to make large wooden pins out of branches as well and pin down the branches tightly against it's surface.


                                                                       Shown here in Paul Wheaton's great new video!
                                                                     

 Use like a spike with crotch pinning down the branches you laid on the surface.
look for sticks that have one long end and a shorter crooked branch, long end goes into pile while side branch hlds down shade branches.


These branches pinned on the outside of the pile offer benefits like support, shading, breaking hard rainfall, & reducing erosion until roots form a netting.  Mulch pathways well.

This must be planted right away. Large seeds are placed by hand, potato, beans, sunflowers, peas. Small seed mix is made from lettuces, greens of all kinds & root vegetables of all kinds. Lupine, purslane, and beneficial flowers like calendula, nasturtium, feverfew, etc... here and there in a separate mix. The size of the seed affects the way it is broadcast, and you do want a fine even spray of seed to go all over the pile.  


Either water very lightly for a few days or let the rain do it for you, settling and shifting will occur, holes can just be filled with soil and patted into place.


The time of year you decide to build your pile, will affect how often you need to water during it's first years.  
If you build in the fall before your rainy season, plant with winter vegetables suitable to your climate and/or plant a cover crop.  A bed that has had all winter to store water will need very little water or none at all depending on your climate and summer rain fall. A hugelkultur built in spring will need water it's first year most likely. However it will use much less if planted as instructed. No bare soil, a green carpet is best. Mulch is good but still expires moisture with out leaves to catch humidity and send it back to soil and plants. Harmless weeds and herbs such as chickweed and scarlet pimpernel, miners lettuce, docks, purslane, clovers should all be allowed to fill in empty spots and cradle vegetables with moisture and shaded soil. Varied root depths draw moisture from deep inside to the upper layers like stairs. 

A wonderful blog with great illustrations  


At the Krameterhof, Sepp Holzer's farm in Austria.


built by Sepp Holzer and his Team!


Many images and my base information drawn from this article;
and my time spent with Sepp Holzer during a 5 day workshop, the first of many to come.


All roads lead to


when you want in depth info or if you'd like to read about dozens and dozens of gardens that have been built with this method

PART 2..
Hugelkultur...I did it my way!!
a continuing journey into creative applications.


Monday, March 4, 2013

Rocket Stove Mass Heaters- A love letter

I've been reading about this for months now and want so very much to begin building one.
          Dedicated to Terri & Ricky in Takilma who treated me like family from day one.

Article updated; 1-2-2016


   Ernie and Erica Wisner

What is a Rocket Mass Heater? 
It is a hybrid of a rocket stove design combined with principles of stone and brick masonry but made with a clay and straw mixture called cob... It is also in a great love affair with sculpture.
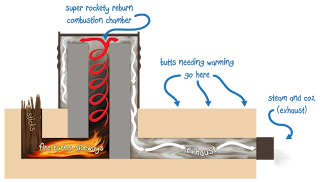
 A rocket stove runs on very small amounts of wood, twig sizes are ideal... making firewood easy to obtain. Wood is placed in a vertical hopper and magically burns sideways. The videos I have compiled here do a lot of the explaining. 

"Mass".. is made of cob in the example above and below.It is sculpted into a bench shape, the "mass" in a masonry structure it is brick or stone, in the greenhouse video below it is earth. Mass..It holds the heat from the exhaust, and releases it  for hours after the fire goes out. 

Unlike a usual wood stove. It is constructed with a j shaped tunnel going up into an oil barrel in many cases, with it's magical guts configured with precise specs...runs super hot like wind tunnel and it sounds like a rocket... thus the term "rockety" has been catching on. The exhaust pipes from the heater barrel portion are run horizontally through a long massive bench capturing and storing the heat. Warm seating and a radiant heat barrel that boasts a ripping spot to cook, boil water, and more.

All this and no smoke, just steam..invisible from any real distance. Pure efficiency when it comes to using wood as fuel. 
Cord wood is not really needed, branches will do and fit well into hopper. Just one reason they are great for the elderly and me.

www.templefire.net
This is a love letter to all the amazing people who have been experimenting and building amazing Rocket Stove Mass Heaters Those who have the brilliance to make it accessible to more people. Making the "mass" of cob, these can be made for very little money by homeowners all over the world.

I am trying to make a one page spot, to store all the best videos and links I have been watching in preparation of building one in our greenhouse and then one for the house. We figured we'd work out all the kinks on one that did not need to be quite as lovely to look at.

New videos will be added to this blog as they emerge in an effort to keep info fresh and current, so please return


 Ernie and Erica Wisner.. Authorities in the Rocket Mass Heater world, have written in great length and with
Paul Wheaton  they have made great videos about the subject. They have TONS of  invaluable experience.
Must read and must follow; as in advice, publications and videos.

Purchase plans 
http://www.ernieanderica.info/shop


*YOU NEED PROFESSIONAL PLANS!! 
You must do a lot of study before you begin to make one at home...
 Buy their plans..be smart.


more links;


Combined with this earthen mass greenhouse design 


Here is the core at work,
 note the metal riser has what looks like cement on top of it at 1:00 and 5:39 min mark
that is the insulation..that tube has an inner metal tube with insulating material stuffed
between it and the outer metal pipe.


 nice visual video from urocketstoves


Cob steps lead to a second floor, bringing warmth up and warming feet. An exceptional site with beautiful cob construction pictures, where I found this. 


  Here is the main book in print, you can buy it a lot of places


   Rocket Mass Heaters © 2007
by Ianto Evans and Leslie Jackson


Paul Wheaton YouTube video's
are used throughout this blog
Go visit his channel, it's filled with goodies.
the very same
Paul Wheaton 
From Permies. com 
& Rich Soil.com
 The information hub and forum where I began this journey. I have not taken as much as I would like from there, for this article because you should go yourself!


Super clear visuals from Zero Fossil Fuel, impressed with his technical methods, and the dry stacked firebricks and more that can be replaced. Welders will find this viable. The rest of us will get a much better understanding of the core.


Masonry heaters are the grand daddy of the "mass" heating technique. Large stone walls with fireplaces, ovens and such built in, holding the heat of the fire for hours after fires have gone out. These are from
A wonderful Oregon Company  Firespeaking whom I would just love to hire!
                               http://www.firespeaking.com/
                                                                   for amazing pictures


from their page as well a rocket mass heater


This is a crazy huge application..with floor heating ...way over my head.. 
The autopsy of it, when they do repairs is a good illustration of how some materials break down and just plain old don't work and should not be thought of as "good enough."


This article is still a work in progress...stay tuned

Urbanite in one of  it's natural environments 
Some home spun fun and BBQ to boot
you can do this kind of Rocket Stove as a warmer upper.


Please let me know if I have used any pictures without proper credit being given
askwildehilde@gmail.com
it can be hard to trace things to their proper origins


Sunday, March 3, 2013

Rain Gardens

Rain Gardens..A method of rain capture used in permaculture. Trenches are dug from downspouts off houses etc and allowed to flow all over a yard and seep in slowly over a larger area. Basins are created and planted.
One of the best articles I have seen is here.
http://midwestpermaculture.com/2008/12/front-yard-rain-garden-and-berm/
This is one of those articles you don't want to lose, and  one I share often...
I needed the link handy...so here it is 


Saturday, March 2, 2013

Green Clean Roof Greenhouse ..What a concept

                                 I hate plastic, I love glass. I love greenhouses, I hate plastic..

Recently I ran across an article about an underground greenhouse with only the roof above ground. The inside was clearly cozy, but the view from outside was less than lovely..plastic sheeting. My greenhouse is plastic, so I get it believe you me, there are not many choices out there. While thinking of cheap ways to obtain glass..
My thoughts ran to these slumped bottles I found on Etsy
                        http://www.etsy.com/listing/91495001/mikes-hard-lemonade-bottle-flattened


I think one could use these or slumped wine bottles as a clear double-walled roof tile, laid out as one would Spanish tiles and wired into place. I'd love to try this idea out on a small scale. The sculptural properties of these bottles would be so much fun to work with. I find this concept worthy of the obvious time and expense for another purpose, a clean rainwater collection surface. Most roofs are not food safe, glass is. I think water collected off this type of roof would be cleaner than most. Where you store the water offers another myriad of  possibilities. Ponds are choice one... how nice it would be to know the water going into it, is not laced with roof goop of some kind. >(pond next to underground greenhouse not being recommended)< Clay pipes which are also clean.. are a good choice to move water to the correct spot for pond or water storage of choice.
Below are the images that inspired this idea.

                                         http://indulgy.com/post/ANlQIN9IH1/underground-greenhouse


                                            http://www.roperld.com/science/solargreenhouses.htm


https://www.forum.haszysz.com/walipini-underground-greenhouse-t22079.html?s=fa6c1953cea049a95d2888b12e7c75f6&amp;
This one is amazing.


How to on making a slump mold to make your own shapes
http://grabcad.com/library/wine-bottle-drape-mold-for-slumping

Okay I did a test here is my new info;
This idea is an art project..in a first test in sunlight, it was clear to me that bottles like this block too much light for some greenhouse uses in some climates. A fun idea if you are trying to defuse the sun in a sun room, room would still be very well lit and make a wow art statement. I still plan to try a small roof for a shed or shade house for clean water collection. 


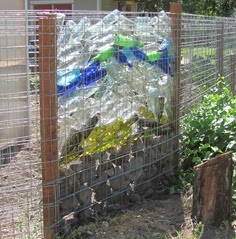
New application ideas would be a wire fence covered with the flattened bottles laid out in Spanish tile pattern. I like the idea because you could sort of see through but still have light and privacy. Some fences block light and limit the types of plants one can have inside their yard. I found some great fence ideas while continuing my reserch and foud this blog;
http://www.lushome.com/plastic-glass-recycling-fences-built-empty-bottles-20-green-building-ideas/71166 

some examples that show a fence that gives privacy and allows some visibility and light through the fence.


Friday, March 1, 2013

Facebook is over

  So I am a facebook addict I suppose. I can't really say anything too bad about it tho..In fact it has inspired many many wonderful things and I love knowing that old friends are now reachable..some whom I had lost to time. 
   I've quipped my ass off, I've shared shameless bullshit and pearls of wisdom, seen new baby's, found ..art music humor science. 
   Downside..ugg ads, trollers with toxic reactions. There are lists of friends you can omit from your daily posts, your shameless game play, photo albums, political views, religious leanings...so as not to offend. OOpsay I posted to everyone. I decided ..make a page for that. So I post some stuff to one page and some things to another page. If you like the page you may like the post. I'm trying, trying not to annoy or offend one person or another...but fuck, I'm complex. 
    Facebook pages are my second trap. I have a few. Each one was me trying to make a hub for an idea, a place where we could talk about that..on our own. 
     Lots is shared, some jewels to be sure. We lose many of our notes, insights and revelations when we comment there, when we write in the wind. I decided to keep this stuff. It's good, it's my diary, just when I thought I'd lost interest in keeping track of the day to day..the things that always seem so amazing years down the road. Even diary's of trackers from the 1800's seem riveting, maybe this will be good someday.
     I don't want it all there on facebook..I want some here.
     You'll be seeing more sketches of my garden work, hearing my chronicles as the gardens I plant grow..  by no surprise I'm sure.
      I intend to live up to my childhood moniker "Cindy Appleseed". I'm trying to get a camera, because these days they say; if there is not a picture it didn't happen. 
  Mining for jewels, not just like it but love it..write about it, promote the DO'ers out there. Glean jewels together. What I love is how we all see the same thing differently, the jewel and it's many facets completes a different picture for each one who views it. 
  I want to write you a letter everyday, because I know I need you to help me figure the world out..you complete me when you agree or dis-agree and tell me what you really think of my muse d'jour.
      
  
                                Random is my middle name.
                                   I'm old and need glasses


This is my new home base for opinion, sharing, some general everyday shenanigans. 

I am no scholar, can't spell, have awful grammar ..damn I like that, think I'll keep it. 

I will change and so will you.